TACTICSCombat manual

How each machine goes down

Five engagements and a closing note. None of these machines is settled by shooting head-on. Every one of them asks you to strip something off first, and nearly all of them punish the same mistake.

AI-01Engagement
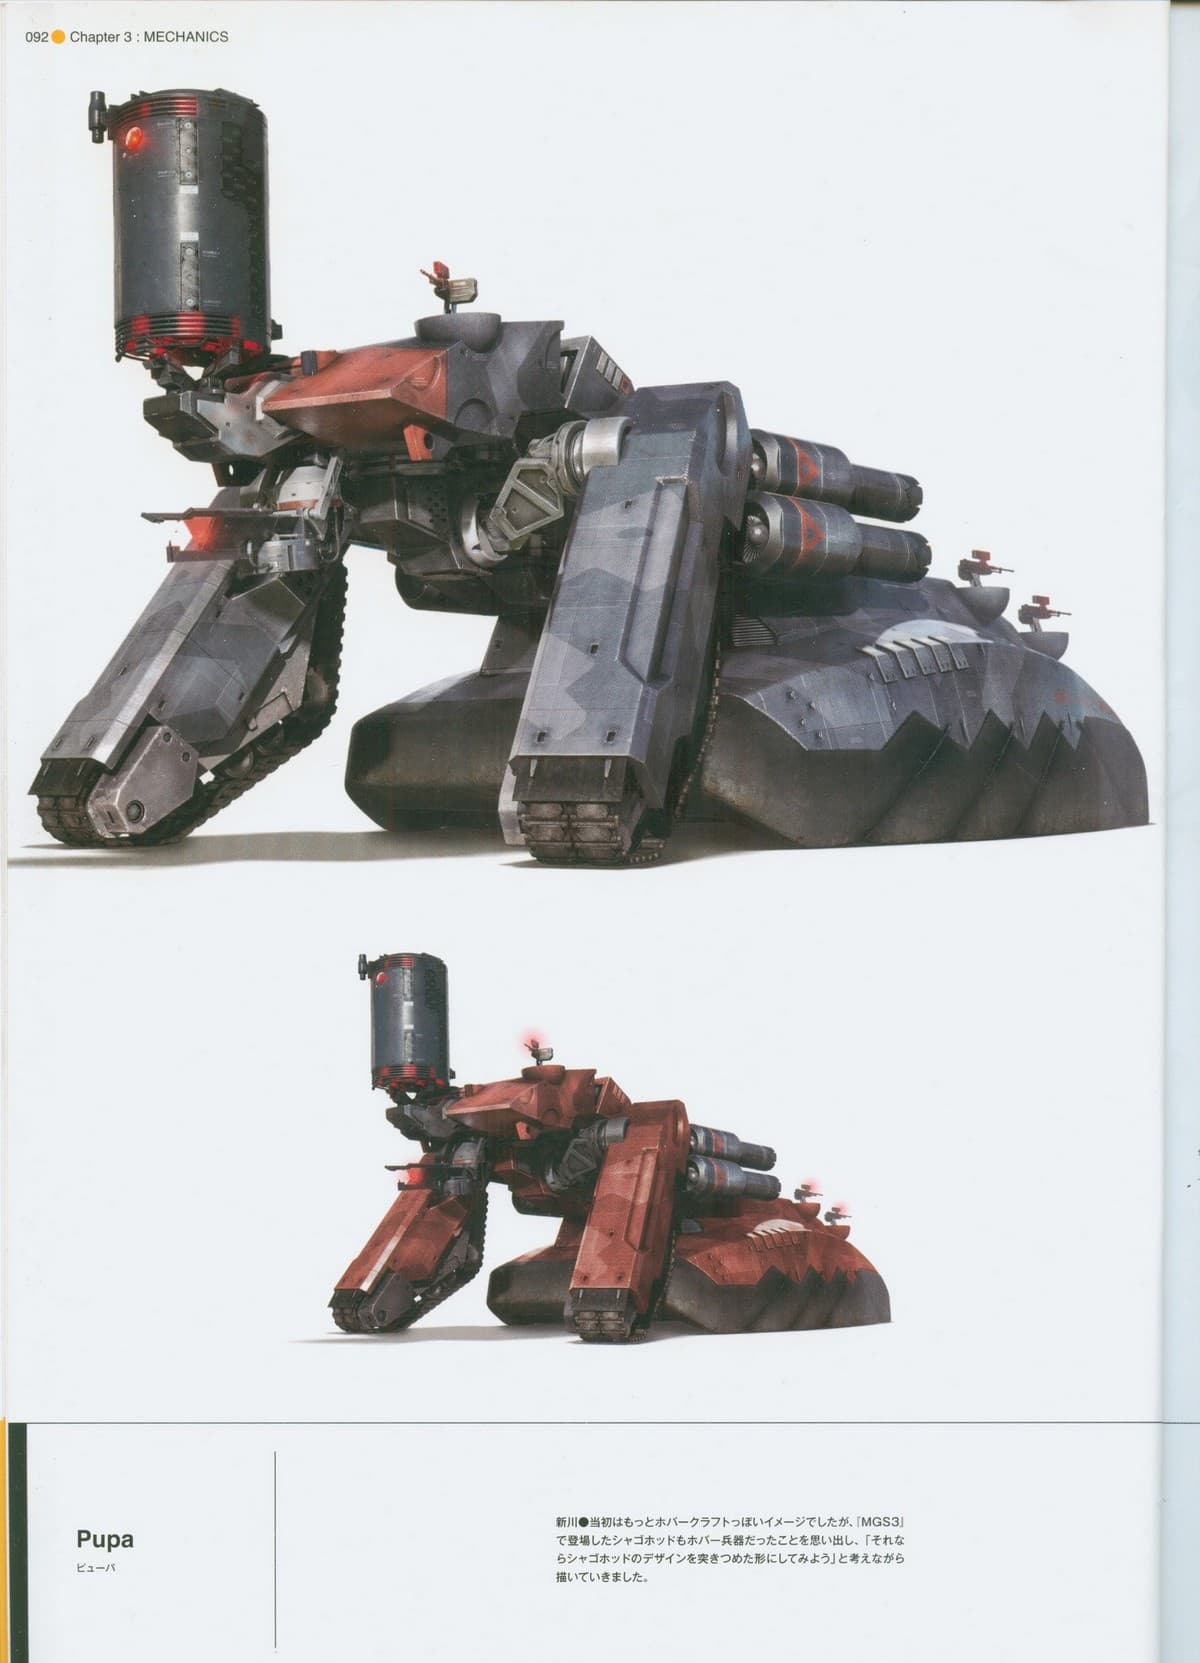
Squat machine in gray and red armor resting on four limbs, with two cannons forward and a cylindrical module on its back.
AI-01

Pupa

The program's first machine, and the manual's first lesson. This is not a target you shoot head-on. It is a target you strip down first and finish afterward.

How it behaves

  1. Saturation fire

    It opens with the rocket pods on its flanks and the machine guns on its back. High rate of fire, but readable. Nearly all of its offense comes from those two batteries, and both can be destroyed separately.

  2. Lightning rods

    The phase that decides the fight. Pupa scatters small lightning rods across the floor, then discharges into them. The arc does not come from the machine. It comes from the ground you just crossed, so the question stops being where it is and becomes where you are.

  3. Direct discharge

    Between one seeding and the next, it fires the current straight at you. No cover helps here. The only defense is to keep moving.

Where it gives

  • The control pod riding on top of the chassis is the target that ends the fight. Everything else is setup.
  • The cylindrical module on its front takes direct rocket hits.
  • The flank rocket pods and the machine guns on its back go down separately, and each one is one attack fewer.
  • The lightning rods are fragile. A rifle magazine clears the ones nearest you without spending a rocket.

What to bring

Two unguided launchers carry the fight — the RPG-2 and the LAW. Pupa moves little, so guidance buys nothing. An assault rifle is the fine tool for the rods. Bring a supply marker: a fight run on rockets runs dry before the pod does.

The common mistake

Treating the electricity as one more attack and running with the field already seeded. These are two threats and they call for opposite answers. Against the direct discharge, never stop moving. Against the rods, shoot the closest ones, go prone, and keep firing from the ground until it passes.

AI-02Engagement
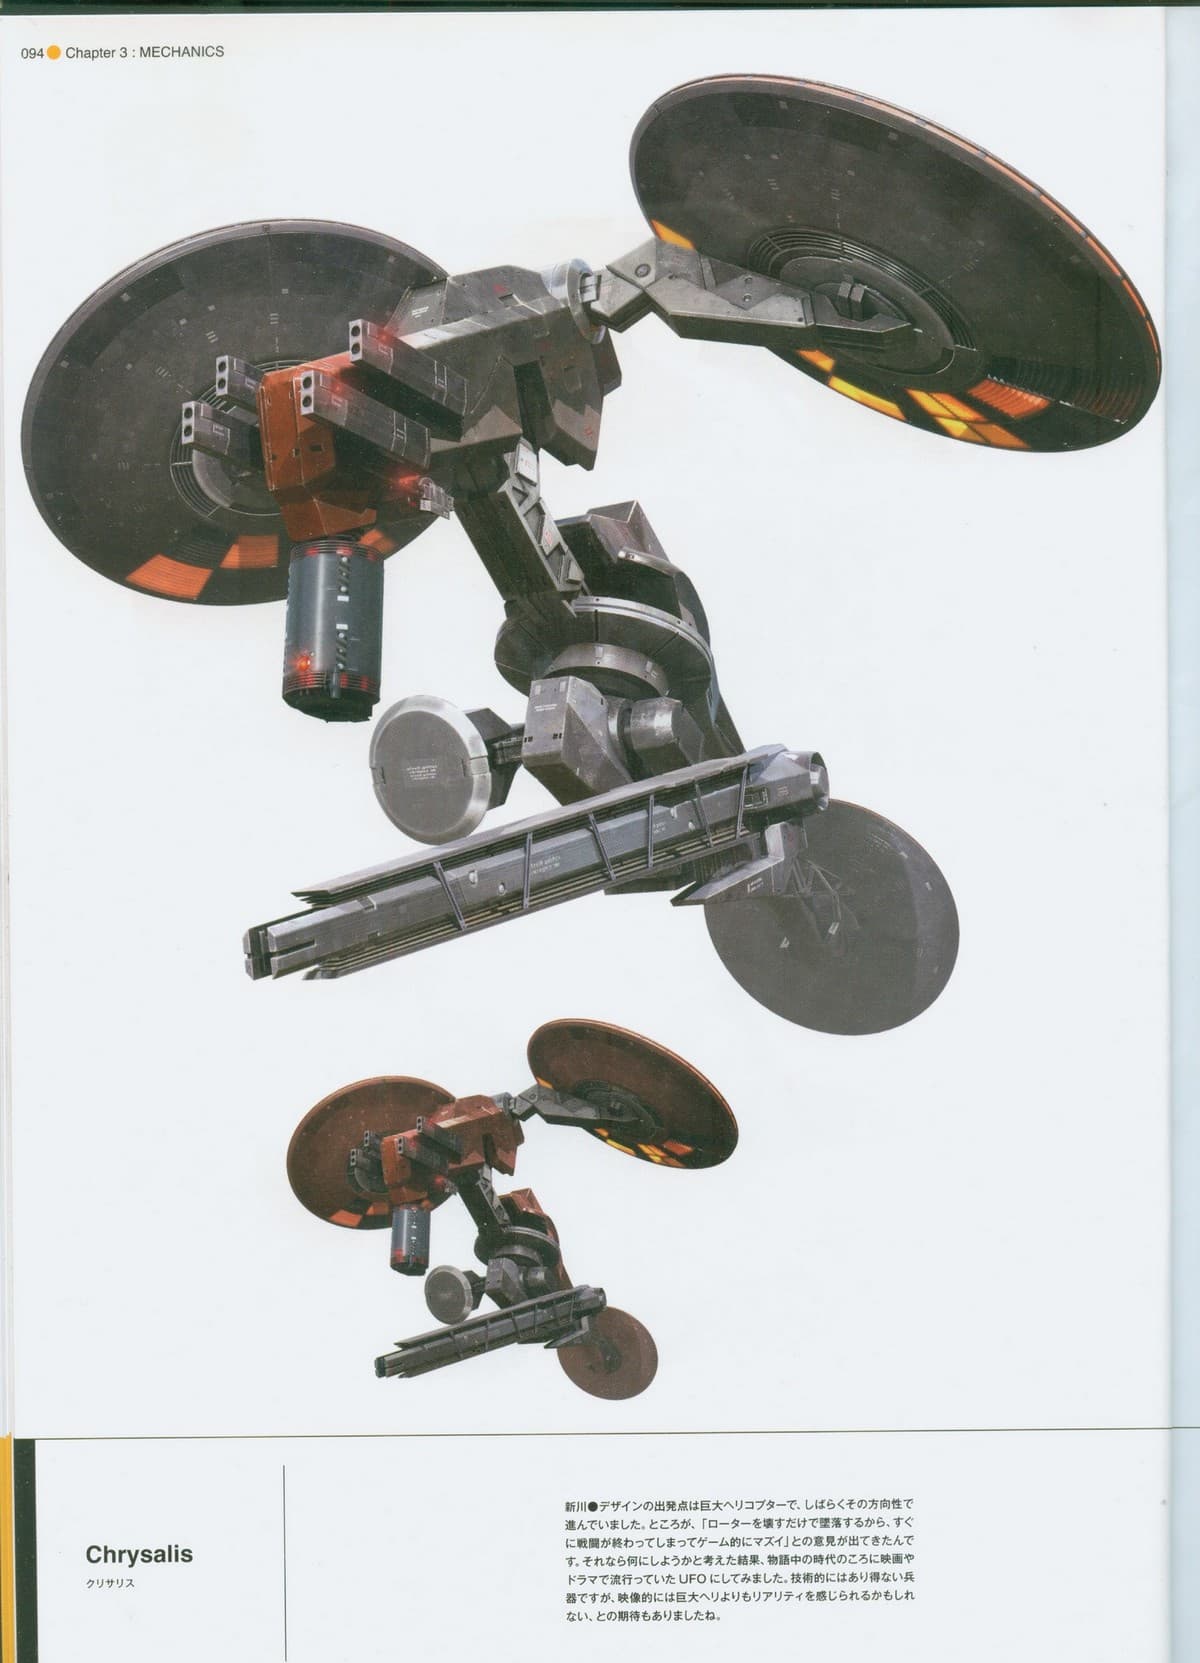
Flying craft with two large tilted disc rotors on articulated arms and a long launcher slung under the central body.
AI-02

Chrysalis

The only fight in the program against a target that will not hold still. Almost everything that works on the ground machines — unguided rockets, frontal cover, patience — works against you here.

How it behaves

  1. Strafing runs

    It crosses the field firing its chain gun and missiles. Every weapon it carries points forward. Outside that cone it can do nothing to you, so running at it, not away from it, is what clears the arc.

  2. Attack mode

    It releases missiles that track you. Standing still does not shake them, and neither does changing your mind halfway. Sustained running in one direction does, until they run out.

  3. Rail gun charge

    It stops, paints you with a red laser, and charges the shot. Its hardest hit, and also the only clean window in the fight: while it charges, it evades nothing.

Where it gives

  • The rail gun charge. A rocket into the pod at that moment interrupts the shot, because it will not move aside.
  • The narrow passage at the southeast corner of the map breaks the rail gun's line. A roll at the right moment works too.
  • Chaff grenades pin it in place for as long as the cloud lasts.
  • The left wing comes off separately, and that is where the rail gun ZEKE later carries comes from.

What to bring

A guided missile over any rocket: the FIM-43 locks the target, while the RPG asks you to guess the movement of something that never stops moving. Chaff to open windows. A machine gun for the filler work between passes.

The common mistake

Committing to the unguided launcher and spending the whole fight missing. The second mistake costs more: taking frontal cover as it comes in. Its firing cone is in front. The safe ground is below and behind.

AI-03Engagement
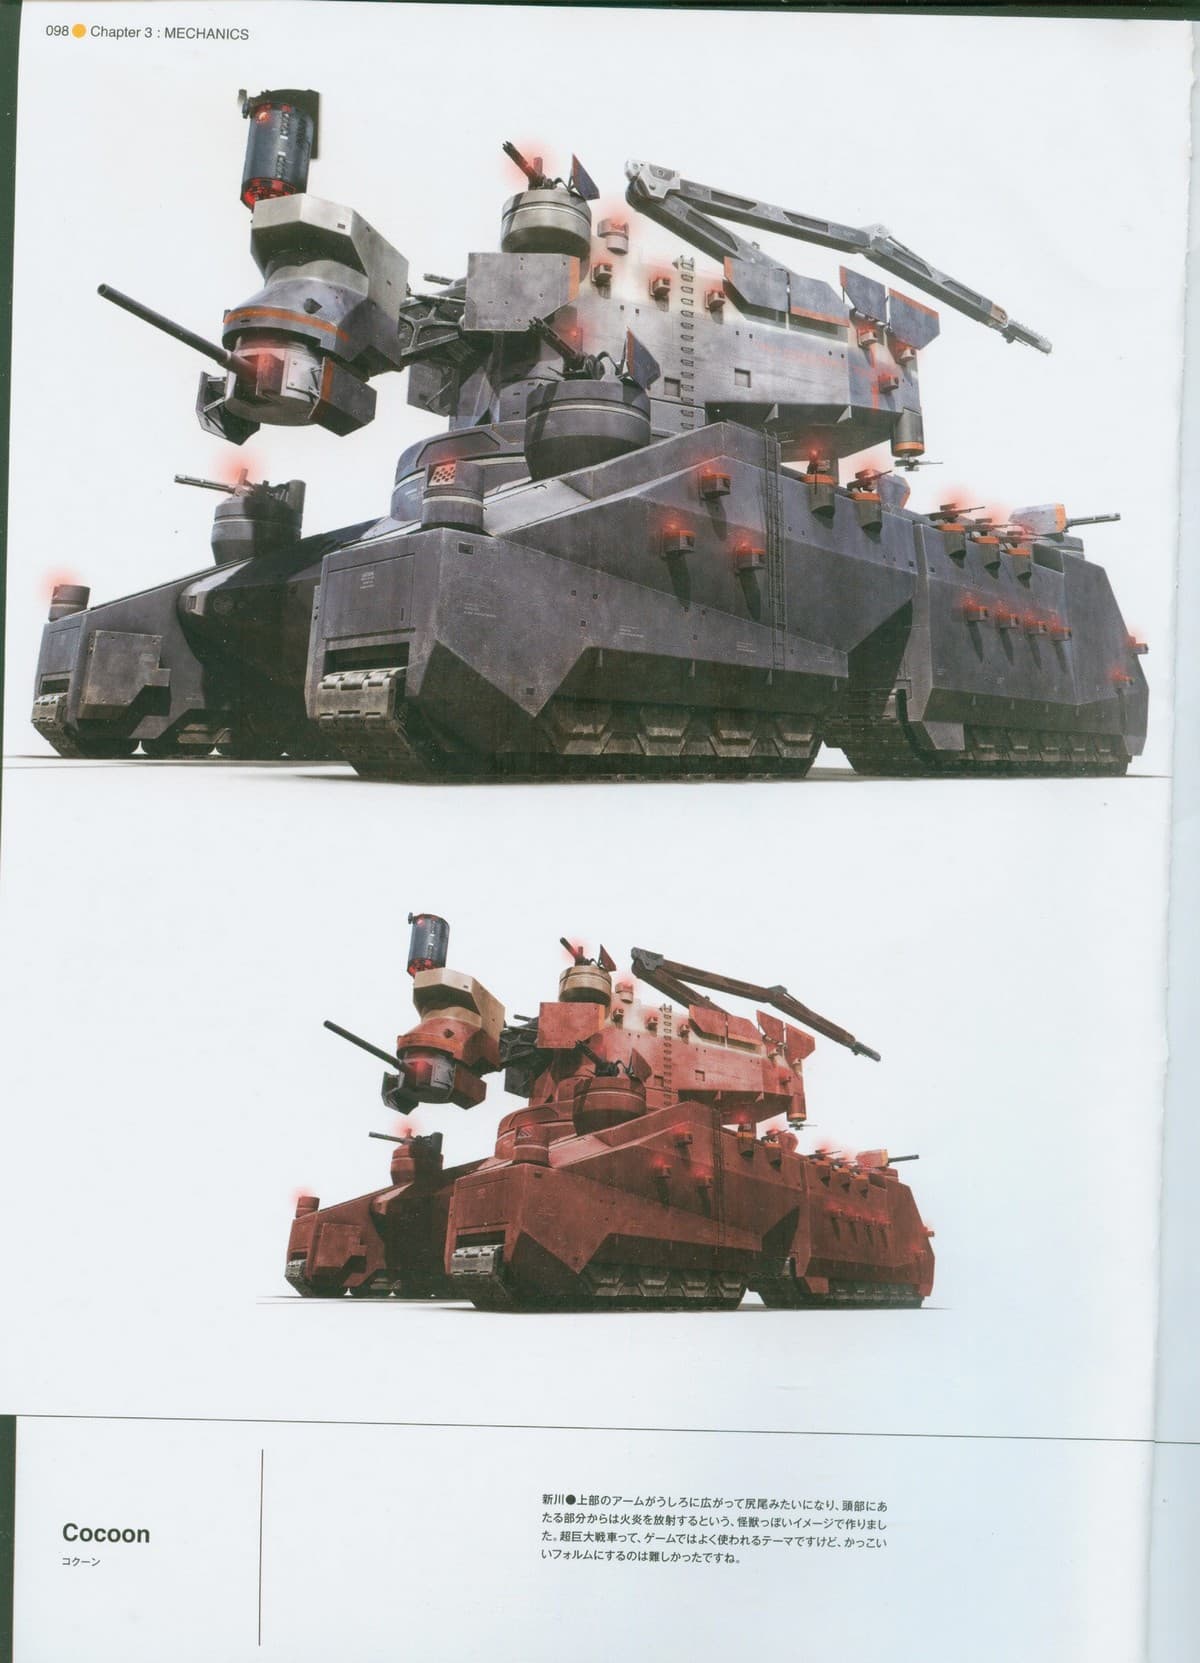
Large armored vehicle on several tread assemblies, with smaller turrets across the hull and an articulated arm folded on the roof.
AI-03

Cocoon

Not a duel. A siege against a moving position. Cocoon chases nobody: it occupies the canyon and fills it with fire. The fight is played at three different heights.

How it behaves

  1. Under the hull

    Underneath it carries two radiators at the center of its belly and a machine gun that sweeps anything moving down there. The most profitable ground in the fight, and the hardest to hold.

  2. On the deck

    Up top, the gatling guns at the stern do the real damage, and the missile batteries mark you before they fire. Switching to another side of the deck the moment you are marked is enough to make the salvo miss.

  3. The ram against the wall

    When it rams the canyon with one of its treads, that tread becomes a ramp. It leads onto the hull, and from the hull to the head, where the pod sits in the open.

Where it gives

  • The two belly radiators. The most effective punishment available from the ground.
  • The stern gatlings. Silencing them before working the pod changes the rest of the fight completely.
  • The pod, once you are up on the head and nothing is shooting at you.
  • The flanks while you climb the tread. During the ram it is busier with the wall than with you.

What to bring

A belt-fed machine gun — the M60 or the PKM — for the radiators and the gatlings. This calls for sustained volume, not one large hit now and then. Save the rockets for the pod. Keep resupply on hand: the siege runs long.

The common mistake

Emptying the arsenal into the whole hull. Cocoon only hands over its armor if the plates reach the end of the fight intact, and those plates sit right on the edge shielding the missile batteries — where any stray burst lands. Shoot at everything and you win the fight and come home without the part you went in for.

AI-04Engagement
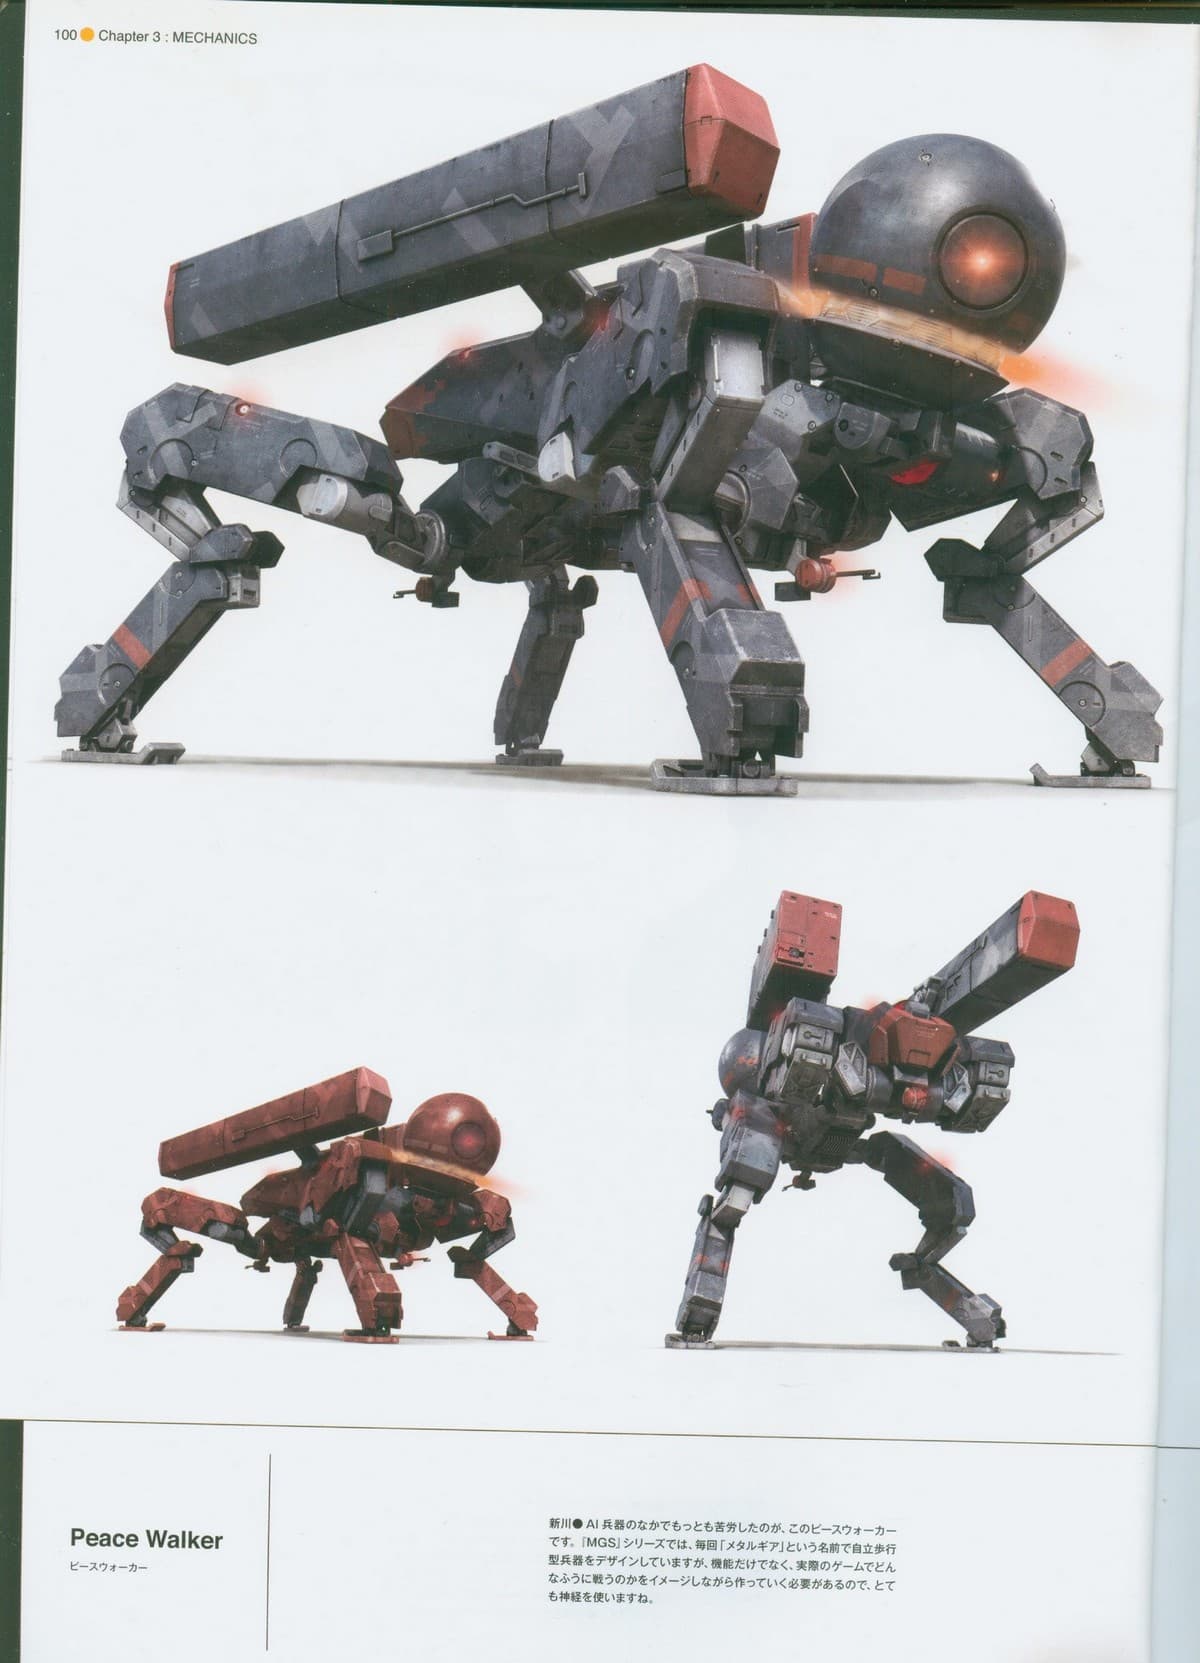
Four-legged machine with articulated legs, an amber spherical sensor at the front and a long cannon over its back.
AI-04

Peace Walker

You fight it more than once, and the second engagement is not the first with more stamina. The repertoire changes and so does the main rule. Go in knowing what that rule is.

How it behaves

  1. First engagement

    It alternates a short-range flamethrower, jumping mines, a howl that hits morale harder than the body, and missile salvos. The pod sits on its back, so the whole fight is worked from behind.

  2. Auto-defense mode

    After taking enough punishment it closes up on itself. This is where the detail that ruins runs comes in: the black orb. While it glows red, any rocket you send comes straight back.

  3. Second engagement

    It keeps everything above and adds drill missiles that travel underground and surface beneath you. There is nothing to read and no cover that helps. Only not stopping.

  4. Pulling back into the buildings

    When it takes shelter behind the structures, the fight stalls. A shot through the gap between two of them forces it to answer, and answering is what puts it back in the open.

Where it gives

  • The pod, always, and always better from behind.
  • The jumping mine can be shot out of the air with a machine gun, and the blast counts against it.
  • The flamethrower is short-ranged. Outside that radius, every time it uses it you are being handed time for a rocket.
  • A support marker dropped underneath brings MSF fire down on it, and in the arithmetic of the fight one strike is worth several rockets.

What to bring

The RPG-2 and the LAW as the striking pair, a belt-fed machine gun to burst the mines in the air and keep steady pressure, and the support marker for the moments it holds still. Rations for the body and something to drink for morale: Peace Walker does not only drain health, and food alone leaves you half covered.

The common mistake

Firing rockets with the orb lit red. The round comes back whole and with the full charge. The other classic loss is slowing down to aim while the drill missiles are in the ground: they surface exactly where you stop.

MG-01Engagement
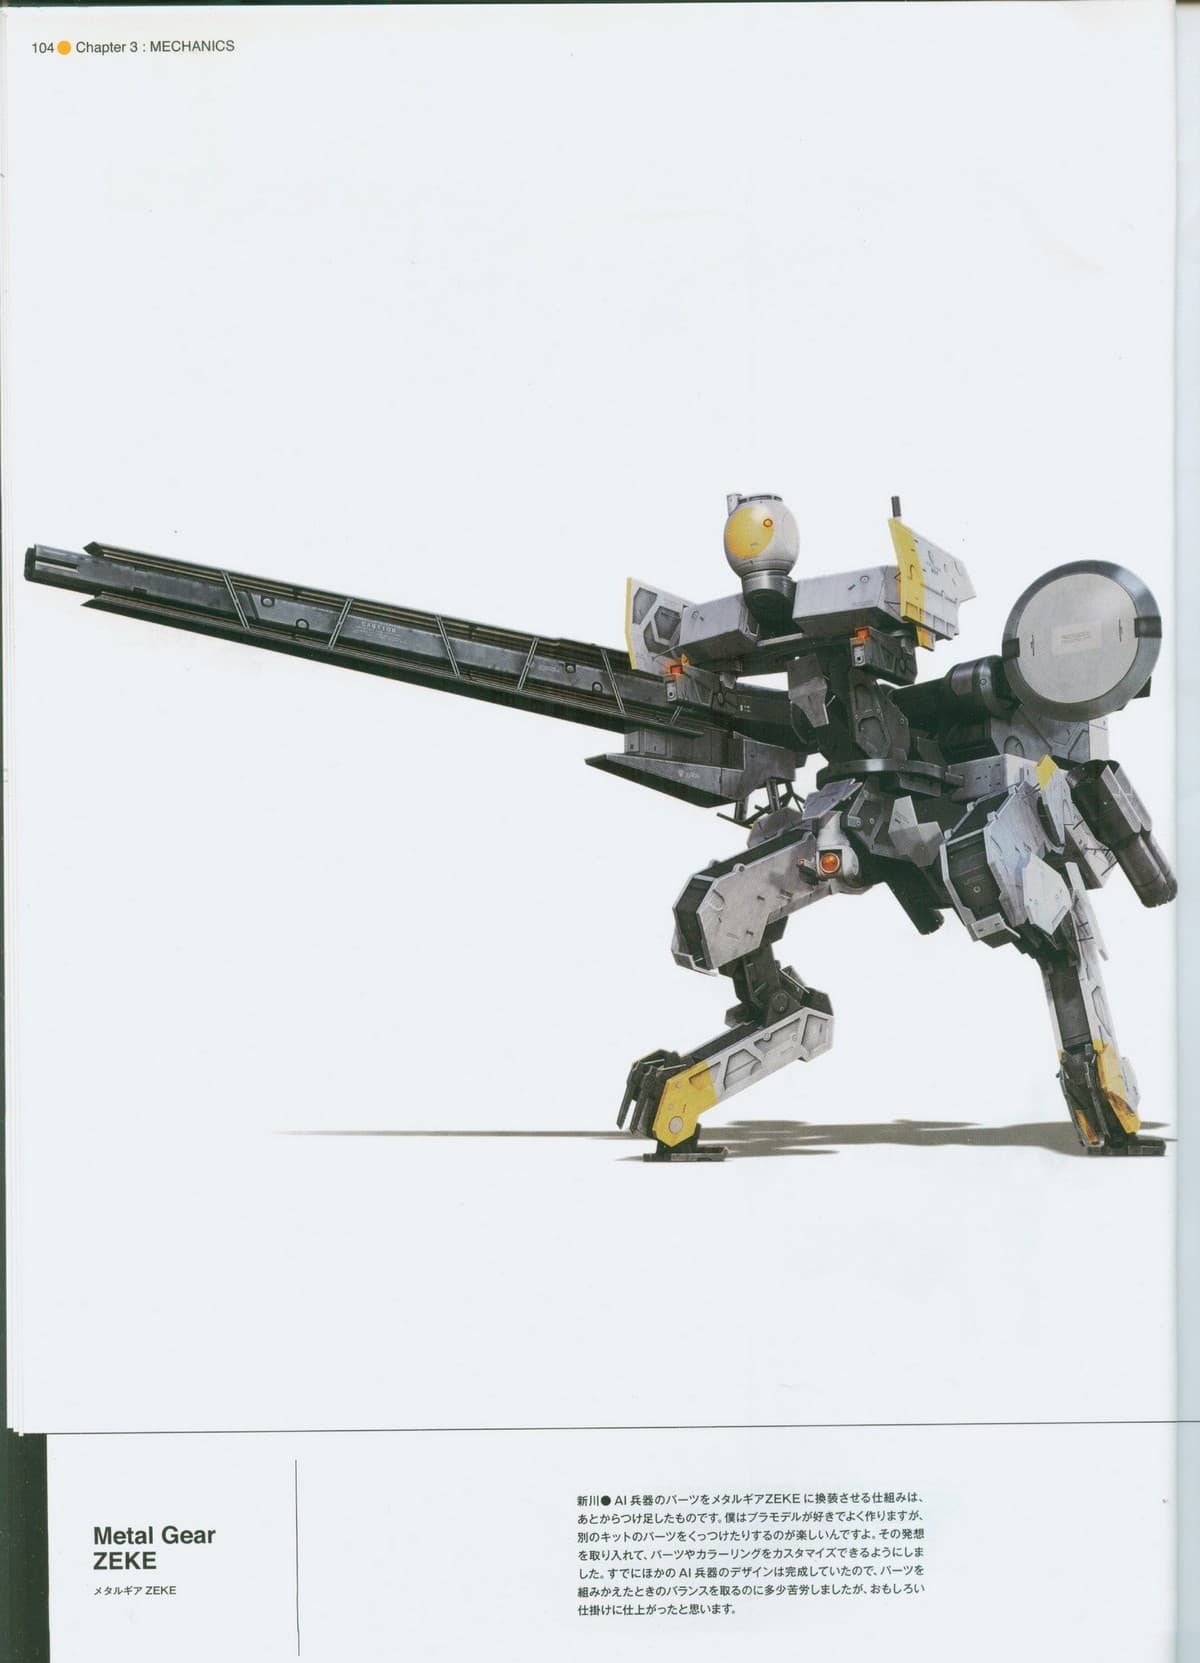
Bipedal Metal Gear in profile, leaning forward, with a long rail gun over its shoulder and a circular radome on its back.
MG-01

Metal Gear ZEKE

It closes the manual because it is the sum of everything before it. Built from parts torn off the program's machines, it fights like Peace Walker, faster and hitting harder. There is no hidden trick. It is a fight of endurance.

How it behaves

  1. Immediate contact

    It starts within striking distance and opens fire with no grace period. The first move of the fight is not to aim. It is to break to one side.

  2. Jump and salvo

    When it jumps to a flank, missiles follow. Running without stopping until they run out is the whole answer, the same as with Peace Walker.

  3. Stomp

    If it tries to crush you, brace with the action button and work your way out by hammering it. The foot is thrown back and the attack turns into a window.

Where it gives

  • Close range. Its chain gun does little damage and misses often, and it is at its worst with you against its legs.
  • The intervals between salvos, when you can return fire without running.
  • The stomp, which turns from attack into opening as soon as you brace and push the foot back.

What to bring

The same load as against Peace Walker, with deeper reserves: rockets, a belt-fed machine gun, and food on hand. The problem here is not landing hits. It is lasting to the end.

The common mistake

Fighting it at range, as if it were an artillery target. At distance you eat everything it fires and give up the only ground where its chain gun stops mattering. The other: going in with nothing to eat and dying to one critical hit on a half-empty bar.

5 engagements on file

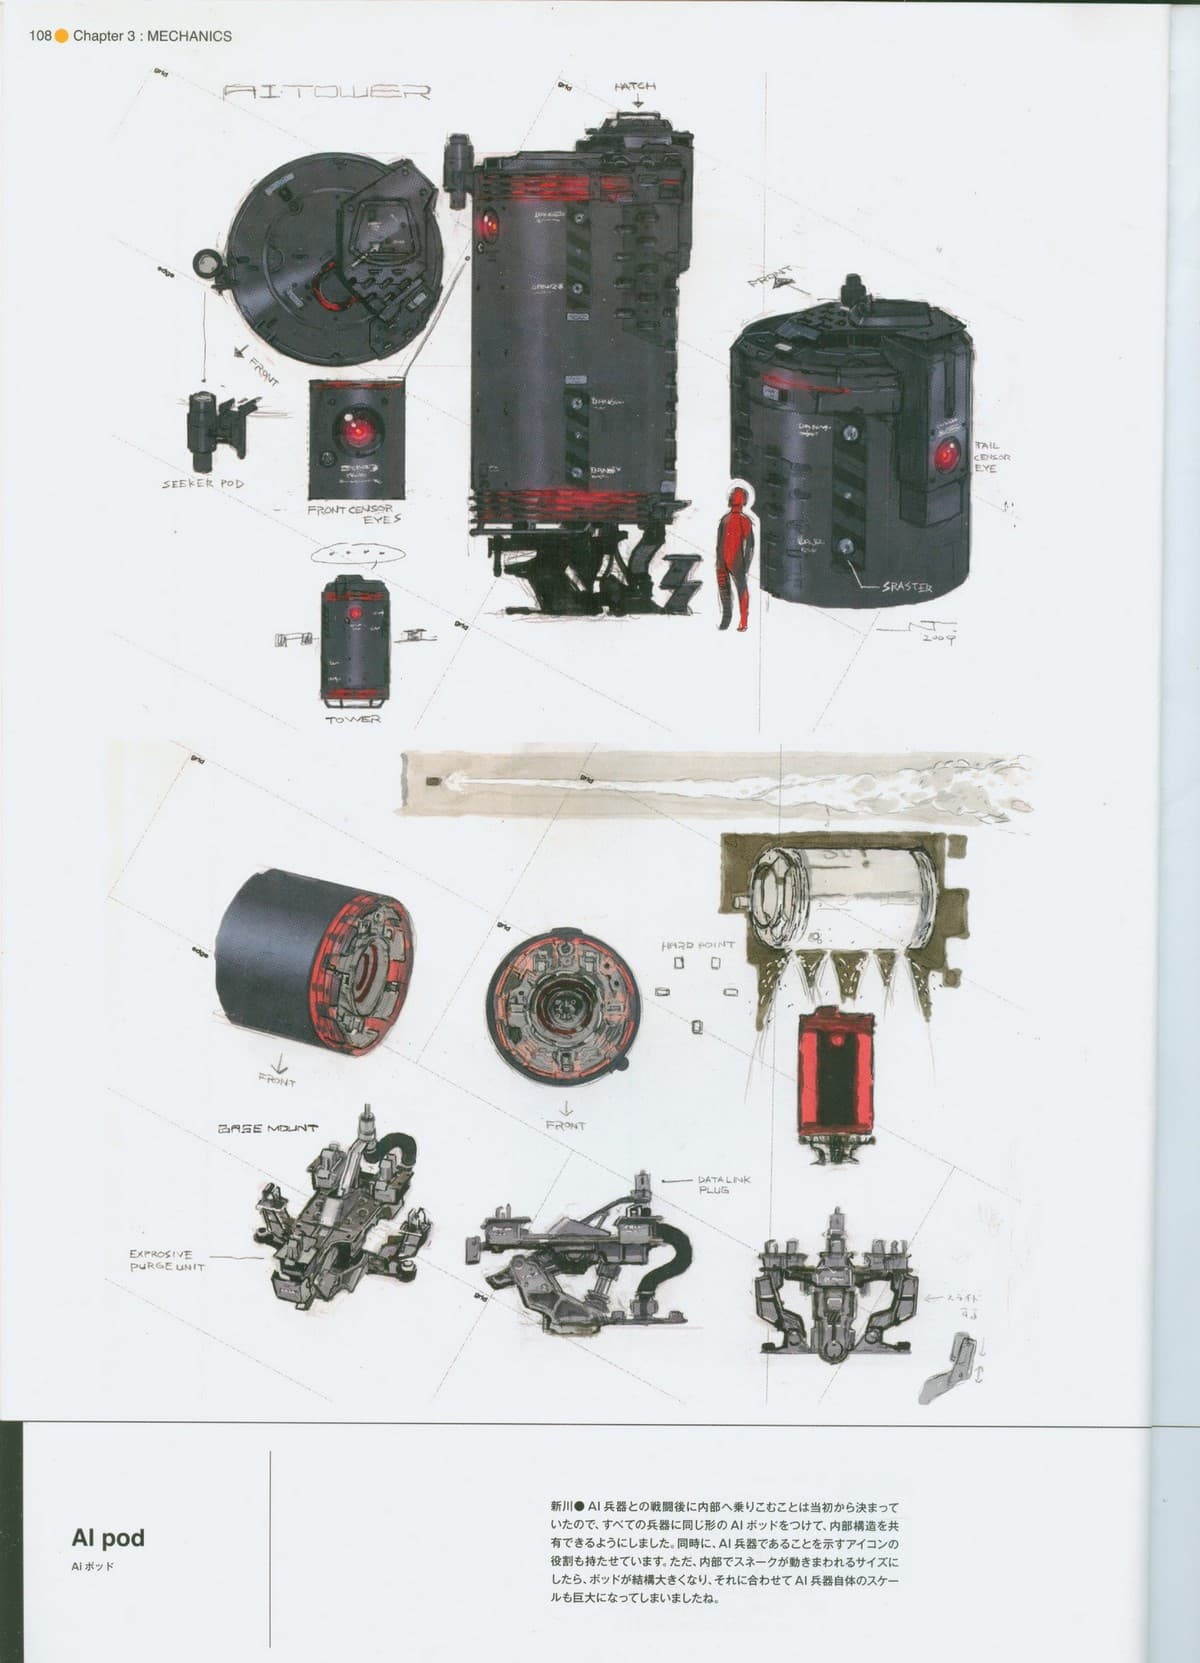
Study sheet of a cylindrical module: plan and profile views, top hatch, sensor eyes at the front, and exploded views of the base mount.
SYS-01
Closing note

The cylinder you have to break

This one is not a fight. It is the reason every fight above ends the same way. Under the armor, the treads, the rotors and the caliber, all four machines of the program carry the same cylinder, and that cylinder is always the target that closes the job. Stripping turrets, launchers and radiators is how you reach it. What ends the fight is the pod. ZEKE inherits the habit along with the part.

It also explains what does not work. The AI weapons have no cockpit to storm and no sentry to put down, so the whole repertoire that clears a base — CQC, extraction, taking the guard quietly — is worth nothing here. Against these machines there is only fire.

Peace Walker is the exception by excess. It carries not one pod but two, the Reptile Pod and the Mammal Pod, split the way the cerebellum and the cerebrum are split. The one worked from behind, the one that falls, is the second.

Hence the discipline of shooting little and shooting deliberately. The parts recovered from these machines — the rail gun from Chrysalis's wing, the side armor from Cocoon, the pod itself — are what gets bolted onto ZEKE afterward. In this program, whatever you destroy past the point of need is what you miss back in the hangar.

MANUALMother Base and the Fulton

How a base fills up

Peace Walker is not won by shooting better. It is won by bringing people home. Everything the platform does — develop, treat, report, go out — runs on the personnel you send up on the balloon. This is the manual for that operation: what the Fulton recovers, where each recruit belongs, and what happens as the base grows.

Diagram of the surface-to-air recovery system: a soldier in a harness on the ground, a helium balloon lifting the line, an aircraft catching it with the nose yoke, and the final winch aboard.Direction of the passNose yoke1Harness and line2Helium balloon3Aircraft snags it4Winched aboardSurface-to-air recovery

Surface-to-air recovery diagram · 4 steps · drawn for this site

MB-01

THE FULTON SYSTEM

The Fulton is not something the game made up. The surface-to-air recovery system — Skyhook, to the men who ran it — was designed by Robert Edison Fulton Jr. in the 1950s, and the CIA and the US Air Force used it through the Cold War to pull people out of places where no aircraft could land. The procedure is the one in the diagram: harness, line, helium balloon, and an aircraft pass with a nose yoke that catches the line in mid-air. In 1974, the year Peace Walker is set, it was still in service.

In the game, that device is the move the whole playthrough turns on. A dead enemy is a casualty and nothing more. The same soldier put to sleep with a dart, stunned, or taken down in CQC gets clipped to the balloon and reaches Mother Base before the mission ends. Killing is expensive for that reason: every man you leave alive is a man who works for you by that afternoon.

What comes back
Enemy personnel, alive and unconscious. A body does not go up on the balloon: shoot to kill and you lose the recruit.
What stops it
A target still on his feet. Put him to sleep, stun him or take him down first; only then does the option appear.
How it improves
The device itself is developed in R&D like any other piece of equipment, and later versions recover more reliably.
MB-02

RECRUIT AND ASSIGN

Everyone who goes up on the balloon lands in Mother Base's waiting room. He produces nothing there; he has to be assigned. Each man carries a score for every unit, and a unit's level comes from what the people inside it contribute. Slots are not infinite, so assigning is always a choice about what you stop doing.

Auto-assign sends each man to the unit where his number is highest. It is convenient and it is almost never what you want: it optimizes the soldier, not your plan. Someone useful in R&D ends up in Combat because he scores a little better there, and the weapon you were waiting on slips another week. If you have a target in mind, assign by hand.

Read the level first
Match the file against the unit he is going to. One high-grade recruit does more than several warm bodies, and takes the same slot.
Where each man comes from
Well-defended posts and harder missions hand over better personnel than a loose patrol out in the open.
Trim the roster
Once the base fills up, discharge the weakest to make room for the ones coming in. The roster gets pruned.
MB-03

SPLITTING THE ROSTER

Mother Base has no single meter to raise. There are several units, each paying in a different currency, and what you gain in one you stop gaining in another, because personnel is finite. How you split the roster is the standing decision of the whole game.

Combat
The unit that goes out. It supplies the teams you deploy on outer ops while you play another mission, and its strength decides whether those ops come back with anything.
R&D
It builds. Every weapon and every device demands a minimum R&D level before it can be developed: without the team, recovered blueprints stay in the drawer.
Intelligence
It reports. What you know about a zone before you set foot in it comes from this unit, and going in blind costs time, ammunition and men.
Medical
It treats. The complement gets hurt and gets sick, and this unit governs how long each man takes to return to his post.
Supply
It feeds and it accounts. It holds up the rest without showing in any report: the unit nobody looks at until it is short.
Command
It is not filled with recruits. It is Snake and Miller deciding which contract is taken and which unit goes out; the whole base works against that decision.
MB-04

MORALE AND REST

A soldier is not a fixed figure. He goes out on an outer op, comes back worn down or wounded, and a man in the infirmary does not perform like a man at his post. The unit drops without you touching the assignments.

The fix is dull and it works: rotate. Rest the ones who come back spent, send the ones who need it to the infirmary, and deploy with the fresh. An exhausted unit put back on the street goes out weaker than its level promises, and outer ops are settled by comparing strength against strength.

It is in the file
Each man's condition — fit, tired, wounded, sick — sits in his record, not on the unit's meter. You have to open it.
Medical pays for rest
The better the medical unit, the less time the base spends healing itself and the sooner its people count again.
There is no shortcut
Pushing the machine is expensive. Not everyone comes home from a badly judged outer op, and those losses are permanent.
MB-05

THE PLATFORMS

The base grows on its own. It is not raised platform by platform against a budget: it fills with people, and with the people the structure spreads. The decks on the aerial view are the receipt for what you have carried off the isthmus.

Expanding is not scenery. A larger base takes a larger complement, and a larger complement means higher units, better equipment and outer ops that do not hang on a handful of veterans. That is the whole loop of the game: pull men off the ground so you can pull more.

What you gain
Room. More slots on the complement and, with them, margin to specialize units instead of spreading everyone thin.
What it costs
Nothing paid up front: the expansion arrives with the personnel. The expensive part is going out to get them, mission by mission.
SECRETSNods and small print

Secrets and details

The material only players catch: a crossover with another series, a jump answered by an eagle cry, radio calls nobody asks for, and jokes buried in the personnel files.

11 entries on file

  • S-01Crossover

    THE ISLAND OF MONSTERS

    Peace Walker met Monster Hunter while Capcom's series was sweeping the PSP. A Felyne named Trenya turns up on the beach with work to offer, and he opens a run of hunts on Isla del Monstruo against Velociprey, Rathalos and Tigrex. The materials they drop unlock gear of your own, a musket copied from a light bowgun included.

    How to see it

    Find the Felyne at Playa del Alba during Extra Ops 029, the item capture mission.

  • S-02Crossover

    THE HOUSE MONSTER

    The trade ran both ways: in Monster Hunter Portable 3rd, a download quest handed over the material for armor that made the hunter look like Snake. Konami added a beast of its own, Gear REX, hunted like the Capcom ones but not confined to the island. It shows up in several stages.

    How to see it

    Take the hunts once the Felyne has opened them.

  • S-03Nod

    THE LEAP OF FAITH

    One of the infiltrations has a hay bale sitting where no hay bale belongs. Climb the roof next to it, drop in, and the game answers with the eagle cry from Assassin's Creed and hands over the Assassin's Straw Box, one more variant of the cardboard box.

    How to see it

    You need a free inventory slot. With a full kit, the box does not come.

  • S-04Radio

    MILLER EXPLAINS THE HAY

    The nod does not stop at the item. Picking it up triggers a radio call in which Miller explains, in full earnest, what the assassins of the Third Crusade used hay bales for. It appears in no objective and no menu: only the player who jumped off the roof ever hears it.

    How to see it

    It fires on its own once you have the straw box.

  • S-05Cameo

    THE MAN ON THE LICENSE PLATE

    The garage at the crater base holds a row of trucks, and you have to pick which one to check. One carries the plate CENTRO AMERICA 63824 PEACE SENTINEL, and Hideo Kojima is riding inside it. He joins the roster as one more soldier. The number is his birth date: August 24, 1963. The other trucks are not empty either; each hides a joke.

    How to see it

    Check that truck during the crater base infiltration. He is the only ordinary soldier you can fire and hire again by repeating the process.

  • S-06Detail

    THE SMALL PRINT ON THE ROSTER

    Every recruit brought up to Mother Base carries a file with a line of his own, written as if he had dictated it. Among the aptitude figures sit plain absurd confessions: one states that, if he ever gets a girlfriend, he would like to climb into a cardboard box with her. The payroll reads on its own.

    How to see it

    Open the personnel files on the Mother Base screen.

  • S-07Item

    THE BOX FOR TWO

    The old cardboard box has a two-seat version here, the Love Box, built for co-op play: two players hide under the same cardboard and move as one. Kojima said he wanted a four-seat model and had to give up, because no such box exists.

    How to see it

    Equip it and crouch next to a partner during co-op missions.

  • S-08Mission

    A DATE ON THE BEACH

    One of the Extra Ops is a date. Number 067 takes Snake to Playa del Alba with Paz, and the whole mission is answering her with the co-op communication commands. Number 068 runs the same plan with Kaz Miller: same beach, same sunset, same commands, not a word changed.

    How to see it

    Extra Ops 067 and 068, once they are open.

  • S-09Design

    A FULL METAMORPHOSIS

    The machines of the project are not named at random. Pupa, Chrysalis and Cocoon all name the stage an insect goes through before it turns adult, and the motif repeats on the armor, scattered with butterflies. The whole program is named after something that has not finished becoming another thing.

    How to see it

    Read the names in the order the machines appear.

  • S-10Detail

    PARTS THAT ONLY DROP INTACT

    ZEKE, the Metal Gear assembled at Mother Base, takes heads and legs stripped from the machines of the project. The condition is awkward: those parts only turn up at the end of a fight if you did not wreck them along the way, so you have to win while aiming somewhere else on purpose.

    How to see it

    Replay the fight against the tougher versions and leave the part you want untouched.

  • S-11Radio

    THE RADIO DOES NOT ALWAYS TALK WAR

    The channel holds conversations no mission asks for. Paz sets off explaining how Costa Rica's leafcutter ants farm the fungus they feed on, or which butterflies cross the parks down there. Nothing signals that they are in the game: they only come up if you call for no reason, between operations.

    How to see it

    Call your contacts with nothing to report, above all after changing area.

The list is short on purpose: only what can be confirmed gets in. None of these entries gives away the final act or what becomes of anyone.
TIMELINEWhere it sits in the story

1974, and all the rest

The series is not played in the order it was released. This is the line of the fiction, with Peace Walker in its place, and with the question that actually matters to anyone about to buy the collection: which game comes in which box, and which one has to be hunted down separately.

  • Master Collection Vol. 1
  • Master Collection Vol. 2
  • Outside both collections

Scroll sideways to follow the line →

  1. 1964

    Metal Gear Solid 3: Snake Eater

    Soviet jungle

    An American agent crosses the border to pull out a defecting scientist and stop a new weapon. Everything that follows starts here.

    Master Collection Vol. 1

  2. 1970

    Metal Gear Solid: Portable Ops

    San Hieronymo Peninsula, South America

    Snake is placed outside the law and builds a unit by signing up the soldiers he captures. Peace Walker takes that recruitment system and makes it the center of the game.

    Outside both collections

  3. 1974

    You are here

    Metal Gear Solid: Peace Walker

    Costa Rica and the Caribbean

    Militaires Sans Frontières takes a contract on the isthmus, sets up its headquarters offshore and tracks a deterrence program that does without a human operator.

    Master Collection Vol. 2

  4. 1975

    Metal Gear Solid V: Ground Zeroes

    American base in Cuba

    A single night infiltration, short and without a pause, working as the prologue to the next chapter.

    Outside both collections

  5. 1984

    Metal Gear Solid V: The Phantom Pain

    Afghanistan and the Angolan border

    The private army rises again on two fronts, with an offshore base that grows as the recruiting goes on.

    Outside both collections

  6. 1995

    Metal Gear

    Outer Heaven, South Africa

    A rookie named Solid Snake walks alone into a mercenary fortress after a weapon he barely knows the name of. The first game in the series.

    Master Collection Vol. 1

  7. 1999

    Metal Gear 2: Solid Snake

    Zanzibar Land

    Snake's second mission, this time against a fortified nation holding its own Metal Gear and the scientist who can make it work.

    Master Collection Vol. 1

  8. 2005

    Metal Gear Solid

    Shadow Moses, Alaska

    An elite unit seizes a nuclear base on an Alaskan island. Snake comes out of retirement to go in without backup.

    Master Collection Vol. 1

  9. 2007 · 2009

    Metal Gear Solid 2: Sons of Liberty

    A tanker on the Hudson and an offshore plant

    Two chapters two years apart. The second one changes protagonist without warning anybody, and that was the scandal of its release.

    Master Collection Vol. 1

  10. 2014

    Metal Gear Solid 4: Guns of the Patriots

    Middle East, South America and Eastern Europe

    Solid Snake's last mission, in a world where war has become an industry with its own accounting. The other main title in Vol. 2.

    Master Collection Vol. 2

10 entries on the line: 2 ship in Vol. 2, 5 were already in Vol. 1, and 3 remain outside both.

Vol. 1 gathers Metal Gear and Metal Gear 2: Solid Snake in their original MSX2 versions, Metal Gear Solid with its VR missions, and the HD versions of Sons of Liberty and Snake Eater.

Vol. 2 also adds Metal Gear: Ghost Babel, released in 2000 for the Game Boy Color. It is not on this strip because it runs in a continuity of its own: it follows the first Metal Gear and then goes its own way.

Portable Ops, Ground Zeroes and The Phantom Pain fall outside both collections and have to be tracked down separately.